How to Start a Squarespace Blog

So you’re thinking about blogging on Squarespace?
There are loads of benefits to starting a blog, whether you’re looking to drive organic traffic to your site and increase sales or present yourself as an authority in your niche. Blogging can have huge benefits in the long run including increasing your exposure, connecting with your audience and boosting your search engine rankings.
The best part about starting a blog on Squarespace, is how intuitive it is to get up and running. If you’re the kind of person who doesn’t have time to sort out tech problems and plugin updates and you’d rather spend your time creating content, then you’re in the right place!
Before we get started, you might want to check a few of these posts out to help you get started on your Squarespace website building journey:
It might feel like Squarespace blogs are kind of an isolated community with all the WordPress noise out there, which is why I’m here to take you through step by step on starting a blog as easily as possible.
How to blog on Squarespace 7.1
In this post I’ll be taking you through the following:
How to start a blog
Customizing your blog page style and layout
How to add categories to your blog page
How to start writing blog posts
Changing your blog post settings
The one thing you should never forget at the end of your blog post!
I hope by the end of this you feel confident about blogging and feel free to let me know in the comments below how it went for you!
How to start a blog
The first thing you’ll need to do is create a blog page in Squarespace.
Head over to your main navigation -> click on the ‘+’ sign -> Add a Blog Collection -> Pick a layout you like -> And enter
Normally it would be great to start with a blank page and customize it as we would like, but don’t worry, we’ll be able to customize the layout later on.
Now you have something that looks a little like this:

Fabulous!
To be clear, your blog page is where your site visitors will be able to scroll through all of your blog content and choose what to read. This is different from your blog posts where your reader will scroll through the actual content of the article.
Customizing your blog page style and layout
There are two ways to customize your blog page in Squarespace.
The first is to click on the edit button on the left hand corner -> Then click the pencil icon on the right

Under ‘Format’ you can stylize your blog page. Feel free to experiment here on what you think looks best. Depending on the layout you have chosen, you’ll have more or less options for customization.
A few things to consider are:

Spacing (Vertical +/or horizontal depending on the layout)
Excerpt (choose to show or hide the caption that provides a summary of the post)
Primary and Secondary Meta content (displaying author name, date published and categories)
Image Aspect Ratio
Under ‘Colors’ select a color palette for your blog page.
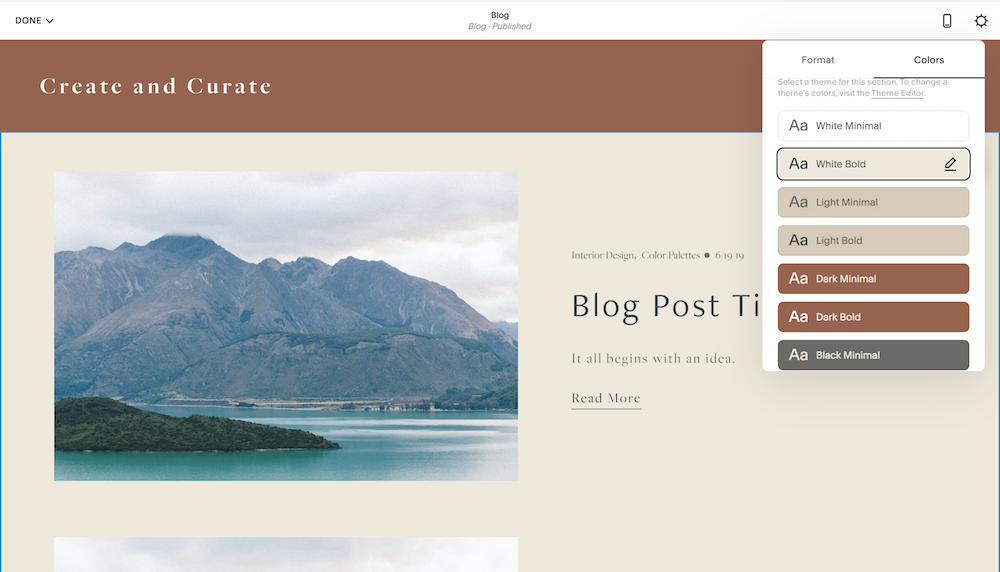
When you’re happy, click on ‘Done’ + ‘Save’.
Next we’re going to customize the backend of your blog page. To do this, click on the gear icon next to the mobile icon.

Under ‘General’ set your page and navigation titles, your URL for your blog, and also the number of posts you would like to be displayed per page before hitting the next button.
Then head to SEO to set the ‘Title’ and ‘Description’ that will appear in search engine results. A handy tip is to keep your description to 160 characters or less.😉
If you’d like to add a custom image for when your blog page is shared on social media, upload it under ‘Social Image’.
And finally, when you pop over to advanced, this is where you can manage your tags and categories. More on this later after you’ve created a few blog posts.
How to add categories to your blog page
The great thing about Squarespace 7.1 is you can customize your blog page by adding sections above and below your blog area.
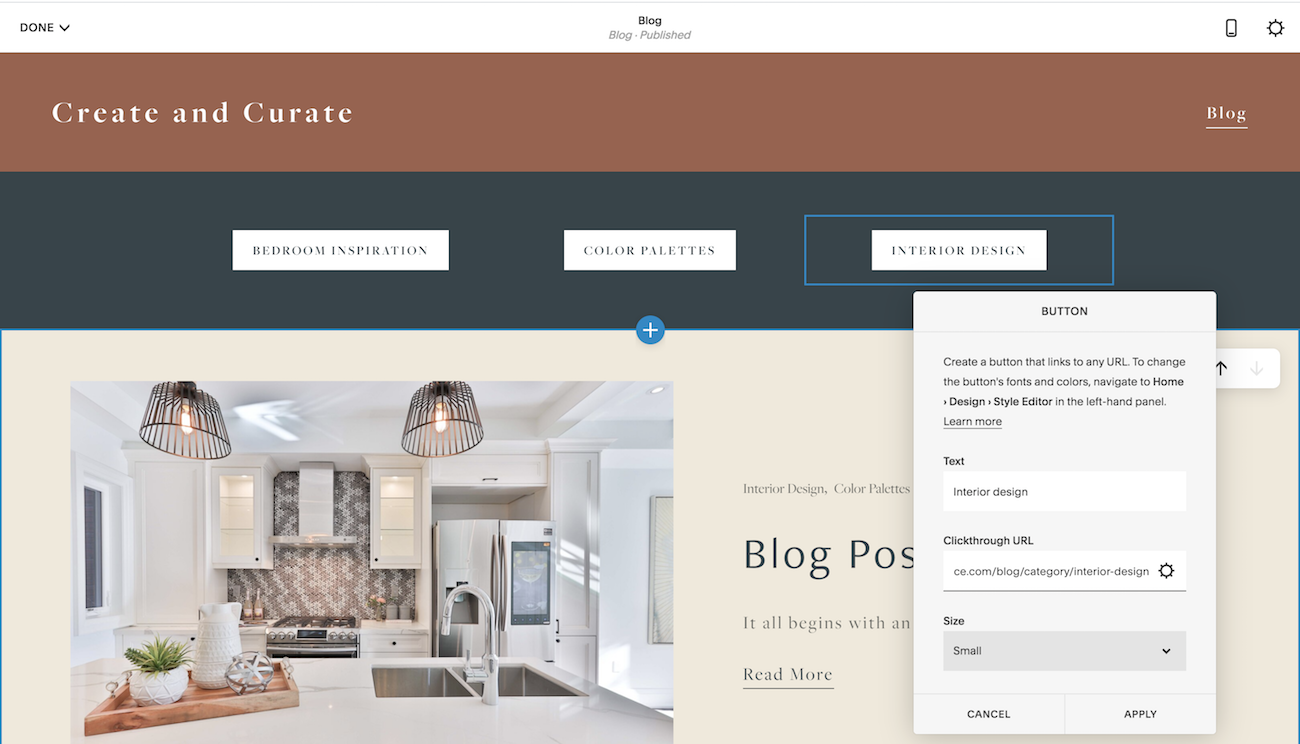
To add categories to your blog page, there are a couple of ways to do this. The first is to add a section by clicking on the blue + sign.
Choose your color palette -> Then add text links that link to the category page
For example this usually looks something like this: www.YOURURL.com/blog/category/CATEGORY-NAME
You can also do this by adding button blocks and linking them to the category.
How to start writing blog posts
When you start a new blog, Squarespace likes to give you a few blog posts to start you off.
You can go ahead and delete these.🙃We’ll be adding in your own content.

To create a new blog post click on the ‘+’ sign. All new posts will start off in the draft mode until you choose to publish them or schedule the post for publishing on a later date.
Add in your blog post title and using the insert points you can add content to your blog post as you would any other page by using the insert points and adding blocks.

To customize the style of your blog post including choosing a different color theme, adjusting the width of the post, displaying the categories and author name, click on the little pencil icon in the corner and adjust from there.
When you’re done hit the save button!
Changing your blog post settings
Adding tags and categories
By using tags and categories you can display posts related to certain topics. To add them to your blog post:
Hit the gear icon-> Click on Content -> Click on tags/categories -> Add in the name of the tag/category


Comments
Allowing your blog readers to comment on your blog post, increases engagement and also sends a signal to Google and other readers that your content is valuable.
To turn on or off your comments at the post level, toggle the comments button left or right.
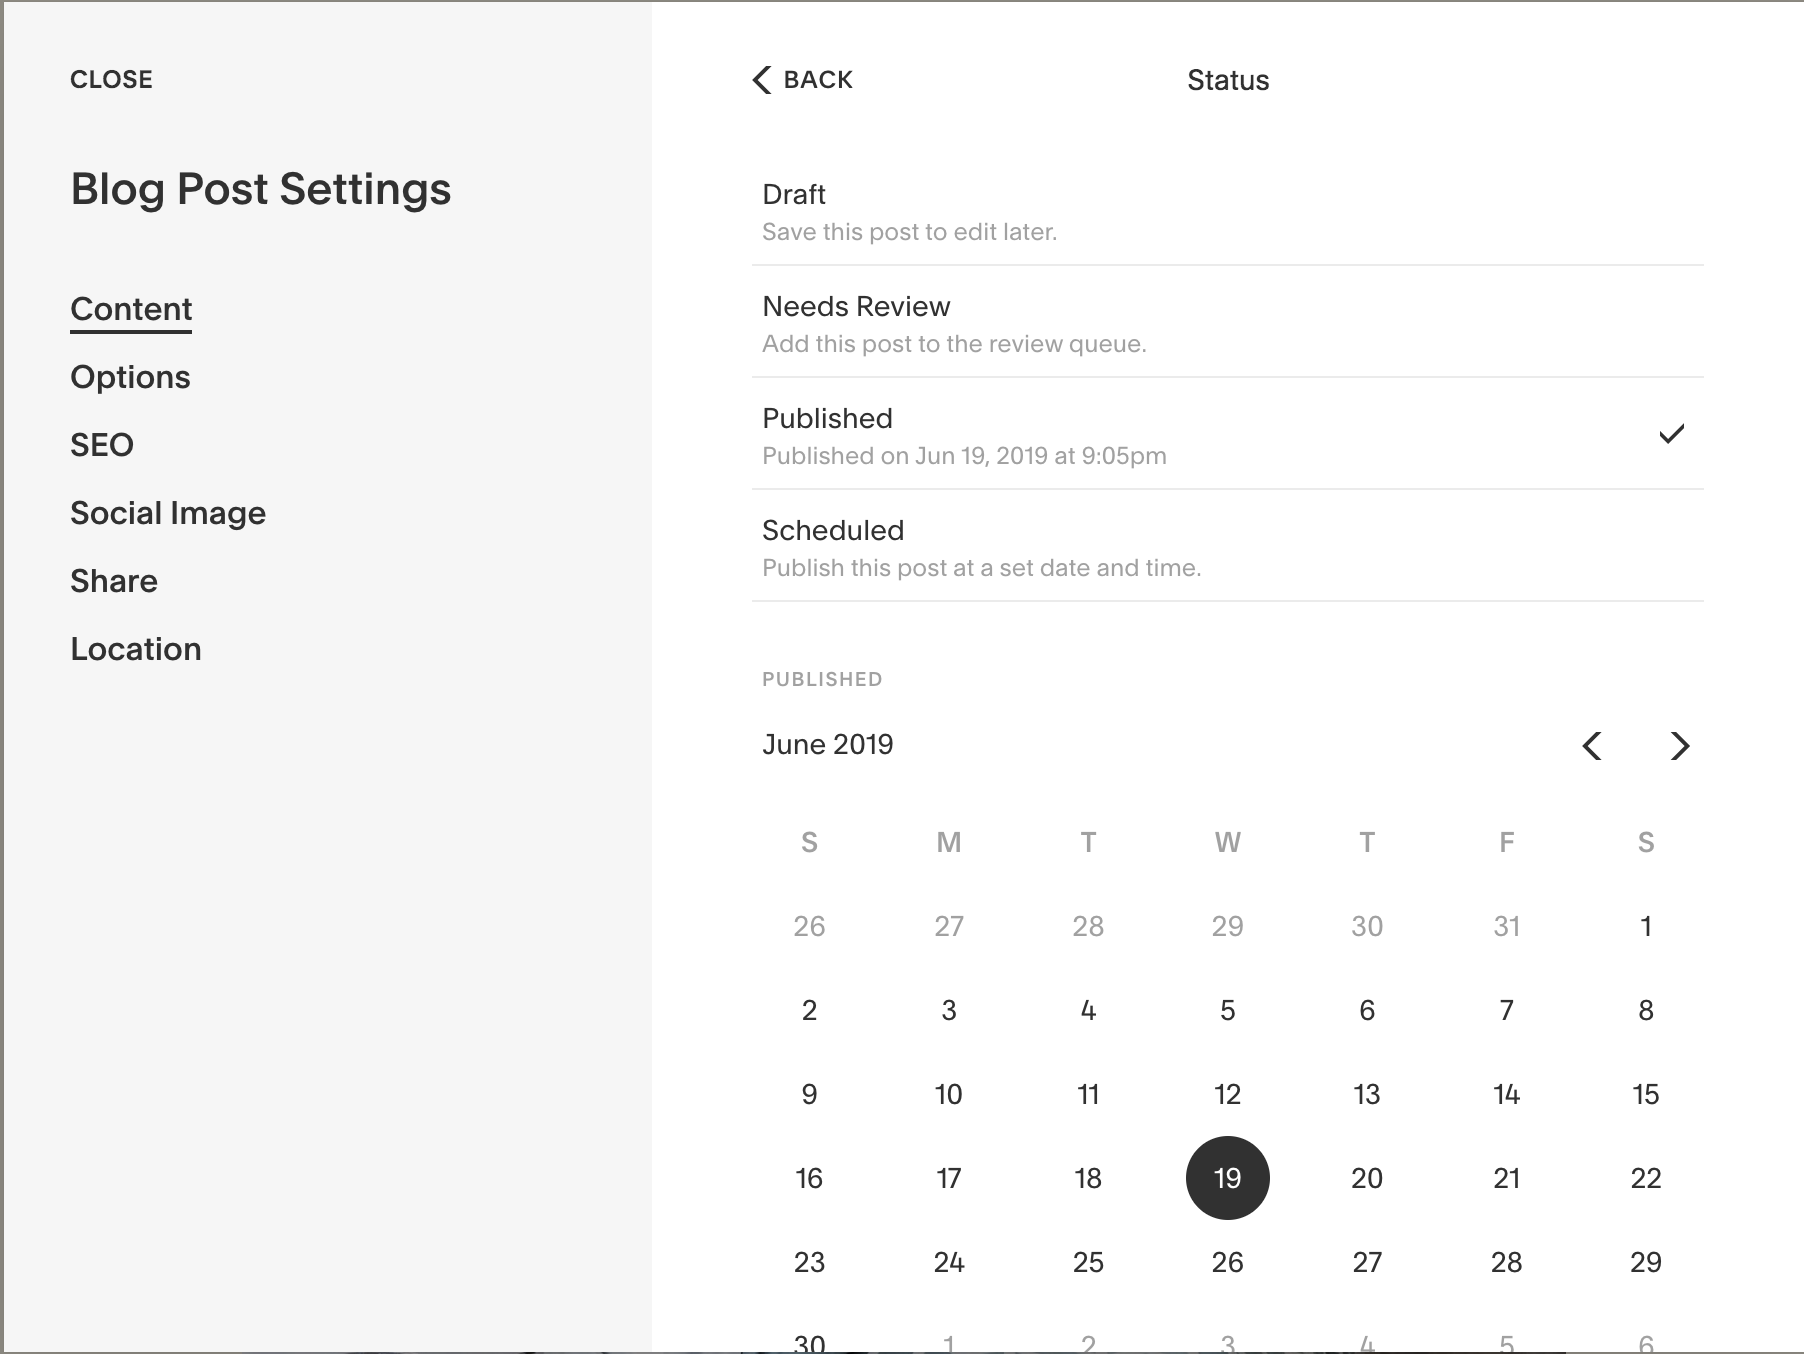
Changing the status of your blog post
Head over to content -> Status
By default your blog post will be in draft status. To publish a blog post straight away, select publish and when you exit the blog post select publish again.
To schedule a blog post for a future date, select the time and date in the future you plan to publish. Remember to hit ‘schedule’ again before you exit the blog post.
If you would like a member of your team to review the post before it's published, select ‘Needs Review’.
Duplicate a blog post
Still under Content, hit duplicate.
Sometimes it’s really useful to duplicate a blog post, especially if there’s a template or layout you really like and don’t want to go to the effort of recreating everything.
Thumbnail image
A thumbnail image is an image that will show up every time your blog post is featured on your website. It’s useful to keep your thumbnails a consistent size. This image doesn’t appear in your blog post, however if you leave it blank the first image on your post will be used by default.
Under Options -> Remove the current thumbnail -> Add in your own thumbnail image
Post URL
Your post URL will normally default to your blog post title. However this isn’t always the most SEO-friendly way to optimize your URL. For more on SEO best practices when blogging in Squarespace, check out this post.
Options -> Post URL -> type your new URL
Excerpt
An excerpt is a short summary of your blog post that lets readers understand quickly what your blog post is about. Whether you choose to display your excerpt or not, it’s always best practice to write one in case you change your mind in the future.
The excerpt can also double up as your Meta description so keep it SEO friendly. ;)
Options -> Excerpt -> Write your new excerpt
To change your Meta description head to:
Options -> SEO -> SEO Description -> type in your new description
Social image
Having a social image is optional for your blog post but if you plan on sharing your post or perhaps you’d love to have your post go viral on a social media network, it’s a good idea to have one in place.😉
For my blog, I like to use Pinterest graphics. These are easy to create in Canva if you don’t have access to Adobe.
To add your social image:
Social image -> Add image
The one thing you should never forget at the end of your blog post!
Don’t forget to add a call to action!
Oh yes! Having a button or a specific action to take at the end of your blog post not only increases conversions but also keeps people engaged on your site for longer, which in turn gives you SEO points with Google.
There are a few ways to do this. One option is to add an email sign-up form another is to add a button to your services page. Depending on what the goal of your blog post is, choose whichever action fits you best.
If you really don’t have a call-to-action, add in some related posts so that your happy blog reader can carry on browsing your site.
I hope these Squarespace blogging tips are useful for you! With so much information out there it can be tricky to know where to start blogging. What I love about Squarespace is how intuitive it is and it’s definitely great for anyone who wants to spend more time creating content and less time on tech migraines.
So for you fellow bloggers out there, happy posting!